알고리즘 클래스 사용 방법 튜토리얼
1 알고리즘 클래스 기본 개념
1.1 기본 개념
FLImaging® 에는 알고리즘 객체(CAlgorithmBase를 상속 받는 객체)가 있습니다. 기본적으로 알고리즘 객체에 이미지 파일만 설정해도 다른 복잡한 설정 없이 바로 Execute()를 호출할 수 있습니다. 여기서 조금 더 섬세한 결과를 얻으려면, 다양한 파라미터를 설정하고 다시 Execute()를 호출하면 됩니다.
알고리즘 수행 기본 구조 : 이미지, 파라미터 설정 → Execute(); 호출
예를 들어 Sobel Filter 알고리즘의 경우, (1)알고리즘 객체 선언, (2)원본 이미지 및 결과 이미지 설정, (3)커널 메소드 설정, (4)Execute() 호출 순서로 알고리즘 클래스를 이용할 수 있습니다. Execute() 의 리턴값으로 알고리즘 수행이 성공했는지 어떤 이유로 실패했는지 확인할 수 있습니다.
CFLImage fliSrcImage;
fliSrcImage.Load(L"D:/ExampleImage.png");

// Convolution Sobel 객체 생성 (Create Convolution Sobel object)
CSobelFilter convolutionSobel;

// Source 이미지 설정 (Set the source image)
convolutionSobel.SetSourceImage(fliSrcImage);

// 결과 이미지 설정 (Set the destination image)
CFLImage fliDstImage;
convolutionSobel.SetDestinationImage(fliDstImage);

// Convolution Sobel 커널 연산 방법 설정
convolutionSobel.SetKernelMethod(CSobelFilter::EKernel_Sobel);

// 알고리즘 수행 (Execute algorithm according to previously set parameters)
CResult res = convolutionSobel.Execute();
2 Source, Operand, Destination
2.1 기본 개념
Source: 이미지 처리의 입력 값이 되는 이미지 혹은 데이터를 의미합니다.Operand: 이미지 처리의 피연산자로써 연산에 사용되는 이미지 혹은 데이터를 의미합니다.- Operand는 피연산자가 필요한 알고리즘에서만 사용되며, 이미지가 아닌 특정 값을 사용할 때에는 Scalar라는 표현을 사용합니다.
- 예를 들어 Add 연산에서, 모든 픽셀 값에 2를 더한다면 피연산자는 Scalar 형식입니다. 모든 픽셀 값에 피연산 이미지의 픽셀 값을 각각 더한다면 피연산자는 Image 형식입니다.
Destination: 이미지 처리 후 출력, 저장하는 결과 이미지 혹은 데이터를 의미합니다.
2.2 SetOperationSource 함수
함수 원형
virtual const CResult SetOperationSource(EOperationSource eOperationSource = EOperationSource_Scalar);
Parameter
EOperationSource eOperationSource- 피연산자를 (Scalar / 이미지) 로 설정합니다.
- Default value :
EOperationSource_Scalar
3 Image, ROI 및 Pivot
3.1 기본 개념
이미지 처리의 주요 개념인 이미지 자체, ROI(Region of Interest), 그리고 Pivot(기준점) 설정 방법을 다룹니다.
Image: 이미지 처리에 사용할 원본 이미지를 뜻합니다.CFLImage클래스를 사용합니다.ROI: 설정한 이미지에서 이미지 처리에 사용할 관심 영역을 지정합니다.CFLFigure클래스 및 해당 클래스를 상속받는 하위 클래스를 사용합니다.Pivot: Source ROI의 기준점을 설정합니다. 기준점은 이후 알고리즘 실행 시 설정한 ROI 영역들의 Intersection 영역을 계산하는 데 사용됩니다.CFLPoint클래스를 사용합니다.
3.2 각 Parameter를 지정하지 않은 경우
Source Image를 제외한 각 Image, ROI 및 Pivot은 필수 Parameter가 아니기 때문에 설정하지 않은 경우 처리 방식을 설명합니다.
Source ROI: Source 이미지 영역 전체를 Source ROI로 설정합니다.Source Pivot: Source ROI의 Boundary Rect의 중심 좌표로 설정합니다.Operand: Source 이미지를 복사하여 피연산자로 사용합니다.Operand ROI: Source ROI와 동일하게 처리합니다.Operand Pivot: Operand ROI의 Boundary Rect의 중심 좌표로 설정합니다.Destination: 이미지 처리 결과는 Source 이미지에 저장합니다.Destination ROI: Source ROI와 동일하게 처리합니다.Destination Pivot: Destination ROI의 Boundary Rect의 중심 좌표로 설정합니다.
3.3 Intersection 계산 과정
-
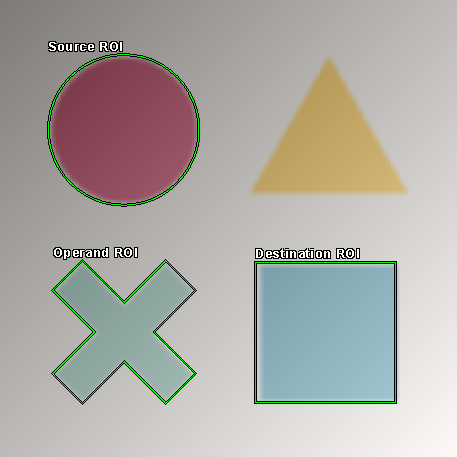
아래와 같이 Source 이미지를 로드하고 Source ROI, Operand ROi, Destination ROI를 지정합니다.
Source 이미지 ROI 지정 
-
Destination Pivot을 기준으로 Source Pivot과 Operand Pivot을 이동합니다.
-
Pivot이 이동한 만큼 Source와 Operand의 ROI도 이동합니다.
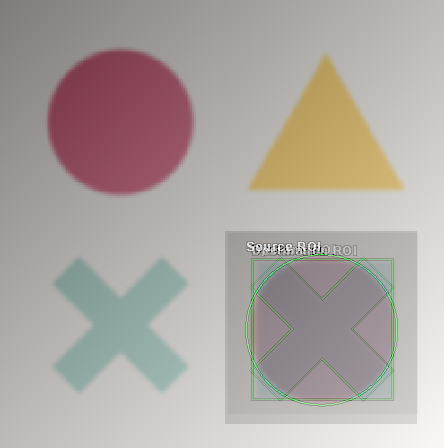
- Pivot이 일치된 상태에서 ROI간의 Intersection을 계산해 출력 영역을 구합니다.
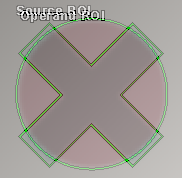
위와 같이 Source ROI와 Operand ROI를 설정했을 때, Source ROI와 Operand ROI의 pivot(기본값은 center 좌표)을 일치시킨 뒤 교집합 영역에 대해 연산을 합니다.
Source ROI Operand ROI 겹쳐진 상태 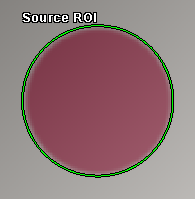
- 연산 결과를 확인합니다.
4번에서 확인한 Source ROI 영역의 이미지와 Operand ROI 영역의 이미지 간의 연산 결과가 3번에서 확인한 Destination ROI 영역의 위치에 출력됩니다. 이 때, Destination 이미지가 없는 경우에는 Source 이미지와 동일한 크기의 이미지가 새로 생성되어 결과가 출력되고 Destination 이미지가 있는 경우에는 Destination 이미지에 결과가 출력됩니다.Destination 이미지가 없는 경우 Destination 이미지가 있는 경우 
Blank Color=RGB(200,200,200)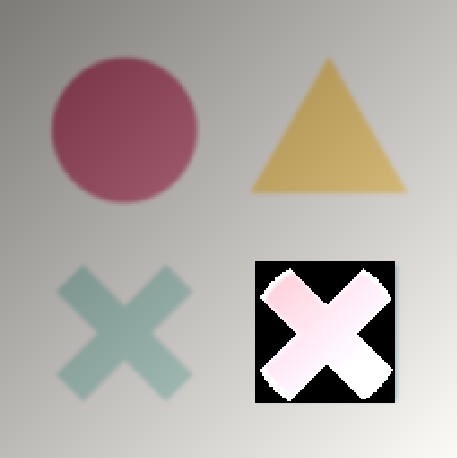
Blank Color=RGB(0,0,0)
Always Fill Blank Color = TRUE
4 Blank Color
4.1 기본 개념
Blank 영역을 설정한 값으로 채웁니다. Source Image의 채널 수 만큼 각각 설정할 수 있습니다.
Blank Color 값이 Source Image의 표현범위를 벗어나면 동작하지 않습니다.
Fill Blank Color 설명
- Fill Blank Color ==
true: Source ROI에 해당되는 구역만큼 연산 처리를 진행하고, 연산 처리가 진행되지 않는 부분에 대해서는 Blank Color로 처리합니다.
만약 Destination 이미지에 Source ROI의 연산이 진행되지 않는 여백이 존재한다면 해당 영역은 Blank Color로 처리합니다. - Fill Blank Color ==
false(Default): Intersection된 ROI만 결과로 나타냅니다. - 이 설정은 Destination 이미지가 있을 때만 적용됩니다.
4.2 GUI 에서 설정
- Always Fill Blank Color : 체크박스를 체크하면
true, 체크 해제하면false로 설정됩니다. - Channel 0~N : Always Fill Blank Color 체크박스를 체크하면, 현재 선택된 Source 이미지의 채널에 따라 0번 채널부터 N번 채널까지의 blank color 값을 설정하는 프로퍼티 아이템이 나타납니다. 여기에 값을 입력하여 blank color 를 설정할 수 있습니다.
4.3 코드로 설정
함수 원형 - EnableFillBlankColorMode()
virtual const CResult EnableFillBlankColorMode(bool bFillBlankColor = false);
Parameter
bool bFillBlankColor- Fill Blank Color 모드
- Default value :
false
함수 원형 - SetBlankColor()
virtual const CResult SetBlankColor(const Base::CMultiVar<double>& mvBlankColor = Base::CMultiVar<double>());
Parameter
const CMultiVar<double>& mvBlankColor- Blank Color 값
- Default value :
CMultiVar<double>()
예제 코드
COperationAdd operationAdd;
operationAdd.EnableFillBlankColorMode(true);
CMultiVar<double> mvBlankColor(255., 255., 127., 127.);
operationAdd.SetBlankColor(mvBlankColor);
COperationAdd operationAdd = new COperationAdd();
operationAdd.EnableFillBlankColorMode(true);
CMultiVar<double> mvBlankColor = new CMultiVar<double>(255.0, 255.0, 127.0, 127.0);
operationAdd.SetBlankColor(mvBlankColor);
operationAdd = COperationAdd()
operationAdd.EnableFillBlankColorMode(True)
mvBlankColor = CMultiVar[Double](255.0, 255.0, 127.0, 127.0)
operationAdd.SetBlankColor(mvBlankColor)
5 Batch Processing Setting
5.1 기본 개념
FLImaging®의 CFLImage 클래스는 Multi Page를 지원합니다.
각 페이지별로 이미지 버퍼를 관리하며, 배치 처리를 통해 한 번의 실행으로 다중 처리가 가능합니다.
- Batch Processing ==
true: Source Image의 페이지 수만큼 Destination Image에 연산 결과가 저장됩니다. Destination 이미지는 기존 이미지 버퍼를 초기화하고 새로 생성하여 사용합니다. - Batch Processing ==
false(Default): Source Image의 현재 페이지 1장의 결과만 Destination 이미지의 현재 페이지에 저장합니다.
5.2 GUI에서 설정
- Batch Processing : 체크박스를 체크하면
true, 체크 해제하면false로 설정됩니다.

5.3 코드로 설정
함수 원형
virtual const CResult EnableBatchProcessing(bool bBatchProcessing);
Parameter
bool bBatchProcessing- 원본 이미지에 담긴 모든 페이지를 한번에 처리할지 여부를 설정
- Default value :
false
예제 코드
COperationAdd operationAdd;
operationAdd.EnableBatchProcessing(true);
COperationAdd operationAdd = new COperationAdd();
operationAdd.EnableBatchProcessing(true);
operationAdd = COperationAdd()
operationAdd.EnableBatchProcessing(True)
6 Processing Unit Setting
FLImaging®은 모든 알고리즘에서 SIMD 및 Multi Thread를 지원하며, 부분적인 알고리즘에 대해 GPU 연산을 지원합니다.
6.1 Processing Unit 전역 설정
6.1.1 GUI 에서 설정
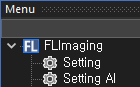
Menu Pane의 Setting 메뉴에서 설정할 수 있으며, 여기서 지정한 Processing Unit에 따라 이미지 처리가 수행됩니다.
6.1.2 코드로 설정
아래 코드는 Processing Unit을 전역 설정하는 방법을 설명하는 예제 코드입니다.
// CPU, Multi Thread를 사용하는 경우
CProcessingUnitCPUMulti puMulti;
puMulti.SetInstruction(CProcessingUnitCPU::EInstruction_Optimal);
CProcessingUnitManager::SetProcessingUnit(puMulti);

// CPU, Single Thread를 사용하는 경우
CProcessingUnitCPU pu;
pu.SetInstruction(CProcessingUnitCPU::EInstruction_Optimal);
CProcessingUnitManager::SetProcessingUnit(pu);

// GPU, Cuda를 사용하는 경우 (단, 지원하는 알고리즘에 한함)
CProcessingUnitCuda puCuda;
CProcessingUnitManager::SetProcessingUnit(puCuda);
6.2 개별 알고리즘에 Processing Unit 설정
6.2.1 Parameter Source설명

-
Global
- 전역으로 설정한 Processing Unit에 따라 이미지 처리가 수행됩니다.
-
Local
- Global 설정에 종속되지 않으며, 개별적으로 Processing Unit을 설정할 수 있습니다.
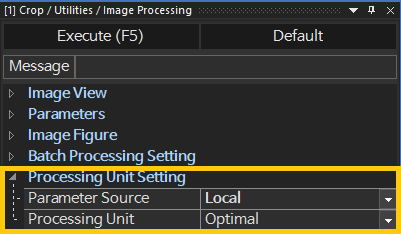
- 아래 이미지는 Parameter Source를 Local로 설정했을 때, 이 알고리즘(Crop)에 적용할 Processing Unit을 설정하는 장면을 나타냅니다.
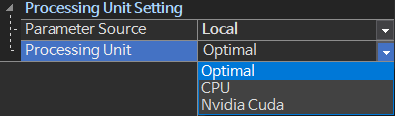
Fig. Processing Unit - Optimal로 설정하면 현재 해당 알고리즘이 지원하는 최고 성능으로 적용됩니다.
6.2.2 GUI 에서 설정하기
아래 그림은 Crop 알고리즘에 대한 프로퍼티 창입니다. "Processing Unit Setting" 카테고리 하위에 Parameter Source 와 Processing Unit 아이템이 있습니다.
6.2.3 코드로 설정하기
함수 원형
virtual const CResult SetProcessingUnit(const CProcessingUnitBase& pub);
Parameter
const CProcessingUnitBase& pub- CProcessingUnit 레퍼런스
예제 코드
COperationAdd operationAdd;

// CPU, Multi Thread를 사용하는 경우
CProcessingUnitCPUMulti puMulti;
puMulti.SetInstruction(CProcessingUnitCPU::EInstruction_Optimal);
operationAdd.SetProcessingUnit(puMulti);

// CPU, Single Thread를 사용하는 경우
CProcessingUnitCPU pu;
pu.SetInstruction(CProcessingUnitCPU::EInstruction_Optimal);
operationAdd.SetProcessingUnit(pu);

// GPU, Cuda를 사용하는 경우 (단, 지원하는 알고리즘에 한함)
CProcessingUnitCuda puCuda;
operationAdd.SetProcessingUnit(puCuda);

operationAdd.Execute();
7 Image Figure Transformation
CFLImage 클래스는 이미지 버퍼 뿐만 아니라 이미지 처리에 필요한 데이터를 함께 관리하여 처리 및 저장이 가능합니다. 알고리즘 클래스에서는 이 Figure 객체들을 포함하여 변환할지 여부를 설정할 수 있습니다.
7.1 Transformation 설명
- Transformation ==
true: Source 이미지에 있는 Figure를 이미지 처리 후 Destination에 복사합니다. 복사되는 위치는 Source 와 Destination의 Pivot Offset만큼 이동합니다. - Transformation ==
false(Default) : Source 이미지에 있는 Figure를 Destination에 복사하지 않습니다. 만약 기존 Destination 이미지에 Figure가 존재하는 경우, 전부 삭제합니다.
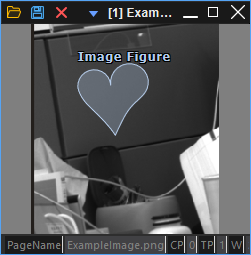
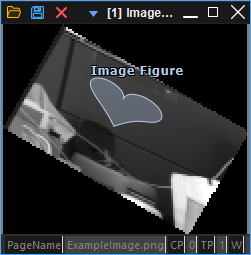
| Source Image | Transformation = TRUE | Transformation = FALSE |
|---|---|---|
 |
 |
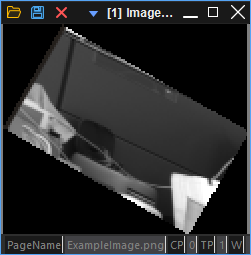 |
위 사진은 Scale Rotation 알고리즘을 Image Figure 가 존재하는 이미지에 대해 적용한 사례입니다. Scale은 x방향은 0.5배, y 방향은 0.25배, Rotation은 30도 회전하도록 설정했습니다. 이 때, Transformation = TRUE 로 설정하면 원본 이미지의 Image Figure 에도 연산이 적용됩니다. Transformation = FALSE 로 설정하면 원본 이미지의 Image Figure가 모두 제거됩니다.
-
Retain Existing Figure ==
true: Destination에 있는 Figure들을 그대로 유지합니다. -
Retain Existing Figure ==
false(Default) : Destination에 있는 Figure들은 Clear합니다. -
Retain Outside ==
true(Default) : Figure 처리 후, Destination 이미지 영역 바깥에 있는 Figure들을 유지합니다. -
Retain Outside ==
false: Figure 처리 후, Destination 이미지 영역 바깥에 있는 Figure들은 제거합니다.
7.2 GUI 에서 설정하기
Image Figure 카테고리의 Transformation, Retain Existing Figure, Retain Outside 체크박스를 사용하여 설정할 수 있습니다. Retain Outside는 Transformation이나 Retain Existing Figure를 체크하지 않으면 출력되지 않습니다.

7.3 코드로 설정하기
함수 원형
virtual const CResult EnableImageFigureTransformation(bool bEnable);
virtual const CResult EnableImageFigureTransformationRetainExistingFigure(bool bImageFigureTransformationRetainExistingFigure);
virtual const CResult EnableImageFigureTransformationRetainOutside(bool bRetain);
Parameter
- EnableImageFigureTransformation
bool bEnable- 이미지 Figure를 처리 결과에 맞게 대응시킵니다.
- Default value :
false
- EnableImageFigureTransformationRetainExistingFigure
bool bImageFigureTransformationRetainExistingFigure- Destination의 Figure 유지 여부를 설정합니다.
- Default value :
false
- EnableImageFigureTransformationRetainOutside
bool bRetain- Destination Image 영역 바깥의 Figure 유지 여부를 설정합니다.
- Default value :
true
예제 코드
CScaleRotation scaleRotation;

CFLImage fliSourceImage;
fliSourceImage.Load(L"D:/ExampleImage.flif");
scaleRotation.SetSourceImage(fliSourceImage);

// ImageFigureTransformation 기능 활성화
scaleRotation.EnableImageFigureTransformation(true);
scaleRotation.EnableImageFigureTransformationRetainExistingFigure(true);
scaleRotation.EnableImageFigureTransformationRetainOutside(false);

scaleRotation.SetScale(0.5, 0.25);
scaleRotation.SetAngle(30.);

scaleRotation.SetInterpolationMethod(EInterpolationMethod_Bicubic);
scaleRotation.SetResizeMethod(EResizeMethod_Resize);

scaleRotation.Execute();